Friday, February 4, 2011

Beef Sirloin Tips with Smokey Pepper Sauce over Herbed Polenta

This was a delicious, quick, and easy weeknight dinner that I will definitely be making again. With only a few steps, you get a hearty and comforting dinner. The polenta recipe is a favorite of mine from Giada that I have adapted for 2 people. You can change the herbs around depending on what you're serving alongside it. The recipe I use is from Giada's Family Dinners but I found one on the Food Network site that's pretty similar so you can view it online.

I didn't change anything from the original beef recipe besides buying already-cut stir-fry meat, but I wrote it out for you below because you have to be a registered user to view it on the Better Homes and Gardens site. Also, the flavor from the barbecue sauce is very strong because it reduces so make sure you use one you really enjoy.

Beef Sirloin Tips with Smokey Pepper Sauce
from Better Homes and Gardens
Makes 4 servings

1 1/2 pounds beef sirloin tip steak
1/2 teaspoon smoked paprika or paprika
1 tablespoon vegetable oil
1 (12- to 16-ounce) jar roasted red and/or yellow sweet peppers
1/2 cup hickory or mesquite flavor barbecue sauce
1/4 cup chopped fresh Italian parsley, if desired

Trim meat and cut into 1 inch chunks; sprinkle with paprika. Heat oil in large skillet over medium-high heat. Add meat, brown 5 minutes. Remove from skillet and drain fat, keep warm.

Meanwhile, drain roasted red peppers, reserving 1/2 cup liquid from jar. (If you don't get 1/2 cup, just add water to the liquid to equal 1/2 cup.) Add peppers and liquid to skillet after draining fat from meat. Add barbecue sauce. Cook, uncovered, 5-10 minutes, stirring frequently until sauce is thickened.

Return meat to skillet, heat through. Sprinkle with parsley and serve immediately over herbed polenta.

Herbed Polenta
amounts adapted from Giada DeLaurentiis
Makes 4 servings

2 (14.5-ounce) cans chicken broth
2 teaspoons salt
1 cup yellow cornmeal or polenta
2/3 cup Parmesan cheese
2 tablespoons butter
2 tablespoons chopped fresh flat-leaf parsley
2 teaspoons finely chopped fresh rosemary
2 teaspoons chopped fresh thyme
coarse ground black pepper, to taste

Bring chicken broth to boil in a large, heavy pot. Add the salt. Gradually whisk in the cornmeal. Reduce heat to low and cook about 15 minutes, until mixture thickens and cornmeal is tender; stirring often.

Remove from heat and add cheese, butter, herbs, and pepper. Stir until butter and cheese melt, serve immediately.

Tuesday, February 1, 2011

2nd Annual Duet Birthday Dinner

You may remember that my sister Meghan, good friend Carrie, and I cooked dinner last year for our mothers, who share the same birthday. This year Carrie and her mom Susan are coming up from Virginia again so we can have a weekend-long celebration.

This year's menu is reminiscent of last year's but also has some new and exciting dishes. The first appetizer, Salsa Parmigiana, is one of my all-time favorites and I can't wait to share it with you. The black-and-white cookies and dessert were at the request of one of the birthday girls, and I'm pretty sure they will be on the menu for years to come!

Happy Birthday ladies!
Duet Birthday Dinner
Appetizers

Dinner

  • Shrimp scampi over linguini
  • Grilled filet mignon
  • Roasted vegetables with Romesco sauce
  • Tomato, oregano, and feta salad
  • Fresh bread

Dessert

Saturday, January 29, 2011

Cheese Straws with Feta and Sun-Dried Tomatoes

So I am now back to taking out an insane number of cookbooks from the library every few weeks. It's a great way to browse through a cookbook, write down a few recipes if desired, or even decide to purchase one if I like it enough. Since I love menus and planning events, I added Celebrations 101 by Rick Rodgers to my bag right away. This book is great - he gives a compehensive menu (including shopping list!) for every major holiday of the year. I love to see dishes put together in a complete meal and, unlike some other cookbooks I have read, would actually eat most, if not all, of these dishes.
I picked out this recipe from the book to bring as an appetizer for my sister-in-law's birthday dinner (I halved the recipe below and only got 16 straws with the way that I cut). I was a little nervous to work with puff pastry in this way, but with a little patience and some counter space it was actually pretty easy. This looks to be pretty versatile as well, as I can imagine almost any crumbled cheese would be delicious here. Enjoy!

Cheese Straws with Feta and Sun-Dried Tomatoes
Makes 40 straws
1 (17.25-ounce) package frozen puff pastry, thawed according to package directions
1 large egg white, beaten until foamy
2 cups (8 ounces) well-crumbled, flavored feta cheese (sun-dried tomato and basil is best)

Position your racks in the oven in the center and top third and preheat to 375 degrees F. Line two large baking sheets with parchment paper or non-stick foil.

Unfold one pastry dough sheet on a lightly floured work surface (a clean counter or a large cutting board). Refrigerate the remaining sheet. Lightly dust the sheet you are working on with flour and roll into a 14x10 inch rectangle. Brush lightly but thoroughly with egg white. Cut the dough in half to make two 10x7 inch rectangles.

Sprinkle half of the crumbled feta evenly over one of the rectangles. Top with the second rectangle, egg-white side down. You are basically making a sandwich with the feta in the middle and the two egg-white sides facing inwards. Lightly roll the pin over the dough to press the cheese into both sides of the dough, or you can lightly press with your hands if need be.

Starting on a long side, cut the dough into 20 1/2-inch wide strips. (As you can see by my commentary above, I only got 16 strips out of half the dough. I also did not measure, but just eyeballed it by continually cutting in half.) Twist the strips into spirals and place 1/2-inch apart on prepared baking sheet. Press the ends of each strip into the pan to prevent untwisting during baking.

Repeat with the remaining dough, egg white and cheese. Freeze the baking sheets for 10 minutes.

Bake, 20-25 minutes until straws are lightly browned; switching the sheets on the oven racks half way through baking time. Let cool about 1 minute on the sheets, then transfer to wire cooling rack.

These can be made up to one day ahead. Once cooled completely, store in an airtight container. When ready to serve, reheat and crisp at 350 degrees F for about 5 minutes.

Wednesday, January 26, 2011

Cheesy Chicken, Bacon, and Rice Soup

With no end in sight to the snowfall here in the Northeast, a good hearty soup is an ideal dinner. This was more of a very thick stew than a soup but it was delicious and filling. The cheese, rice, chicken, and bacon are superb all together and there are a whole bunch of veggies in there to make it a complete meal.

I saw it on Picky Palate and made it according to the orginal recipe from smithfield.com (link below). The only thing I changed was to use a pound of shredded chicken breast instead of a store-bought chicken. To make this even better, serve with some Texas Toast! :)

Cheesy Chicken, Bacon, and Rice Soup

Saturday, January 22, 2011

Cranberry Orange Mini-Muffins

Wow, I am behind with posting, I apologize! January has actually been a pretty busy month, with February looking even busier! But I promise to get to the blog and post all the yummy things I have been making in my kitchen.

So this is the last recipe to post from Christmas Eve Brunch. I took a basic recipe for muffins, added the ingredients I wanted to, and then baked them in mini-muffin form; resulting in a delicious little bite.

Cranberry Orange Mini-Muffins
Makes about 24 mini-muffins

1 3/4 cups all-purpose flour
1/3 cup plus 2 tablespoons sugar, divided
2 teaspoons baking powder
1/4 teaspoon salt
1 teaspoon orange zest
1 beaten egg
3/4 cup milk
1/4 cup vegetable or canola oil
1 teaspoon orange extract
1 cup coarsely chopped cranberries

Preheat oven to 400 degrees F. Grease 24 mini-muffin cups or line with paper baking cups.

In a large bowl, whisk together flour, 1/3 cup sugar, baking powder, salt, and orange zest. Make a well in the center of flour mixture; set aside.

In a medium bowl, combine egg, milk, oil, and orange extract. Add egg mixture all at once to flour mixture. Stir just until moistened, add in cranberries.

Spoon batter into prepared muffin cups, filling each 2/3 full. Bake 12-15 minutes or until toothpick inserted in center comes out clean. Cool on wire rack for 5 minutes, remove from cups and serve warm if desired.

Friday, January 14, 2011

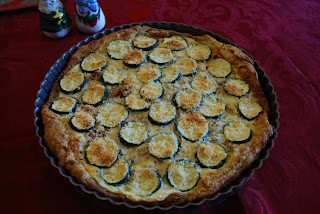
Zucchini, Sun-Dried Tomato, and Mozzarella Tart

This recipe is an old favorite of mine - it has an impressive presentation that doesn't really take a lot of work. And it has a lot of my favorite flavors, all laid out for you in the title! The sun-dried tomatoes add a nice bite and the mozzarella cheese complements the zucchini nicely.

As with the mushroom quiche I just posted, if you are making this in advance, I recommend baking it right away, otherwise the crust will get soggy. Then just reheat in a 250 degree oven covered with foil until warm, or you can just serve it at room temperature. My pictures show the tart before reheating, hence why it is still in the tart pan, but be sure to remove to a serving platter before eating.

I haven't made any changes to the original recipe from Bon Appetit/Epicurious.com:

Tuesday, January 11, 2011

Wild Mushroom, Bacon, and Cheddar Quiche

I was looking for a quiche-style type for dish for Christmas Eve Brunch that wasn't too heavy on the eggs and had some extra flavors. This recipe definitely fit the bill, with the woody taste of mushrooms blending with the creamy cheeses and crisp bacon. The original recipe called for a pound of mushrooms but I couldn't imagine that many in a 9" pie plate, so I just bought 8 ounces of sliced baby bellas and that was definitely enough.

If you are making this in advance, I recommend baking it when you prepare it, otherwise the crust will get soggy with the raw ingredients. Cover and store in the refrigerator once it cools, then reheat in a 250 degree oven until warm. Cover it with foil in order to keep the crust from browning too much while reheating. Enjoy!

Wild Mushroom, Bacon, and Cheddar Quiche
slightly adapted from spreadphilly.com
Makes 8-10 side dish servings

3 garlic cloves, peeled
1 teaspoon olive oil
4 bacon strips, cut into 1/2" pieces, or 4 tablespoons REAL Bacon Bits
8 ounces sliced mushrooms
1/4 cup finely chopped sweet onion
3 eggs
1 (8-ounce) package cream cheese, room temperature
1/2 teaspoon salt
1/4 teaspoon pepper
1 sheet refrigerated pie pastry
1 cup shredded sharp cheddar cheese
2 tablespoons grated Parmesan cheese
1/8 teaspoon paprika

Preheat oven to 425 degrees F. Place garlic on double layer of heavy-duty foil, drizzle with olive oil, wrap to cover, and bake for 15-20 minutes, until softened. Remove and let cool.

Reset oven to 375 degrees F.

If using bacon strips, cook bacon over medium-high heat in large skillet until crisp. Remove and drain on paper towels reserving 2 teaspoons drippings in skillet. Saute mushrooms and onion in drippings until tender, 5-6 minutes. If using REAL Bacon Bits (which do not need to be cooked), heat 2 teaspoons olive oil in skillet to saute mushrooms and onion.

In large bowl, beat eggs until foamy with handheld mixer. Add softened cream cheese and beat well. Mix in salt, pepper, mushroom mixture, and softened garlic.

Unroll pastry in 9" pie plate. Trim and flute edge. Fill with layer of cheddar cheese, then bacon or bacon bits. Pour egg mixture over top. Sprinkle with Parmesan and paprika.

Bake for 30-35 minutes or until a knife inserted in the center comes out clean. Let rest for 15 minutes and serve warm.