Monday, March 30, 2009

Antipasto Pasta Salad

I started this blog late in the summer last year, so a lot of you may not know that I am obsessed with pasta salad, especially in the warm weather. I would eat it for lunch, snack, and dinner if I could (and sometimes I do!). There are just so many different variations, and it's the perfect dish to take to almost any get-together.

I have so many recipes in my files for new pasta salads to try, but sometimes the best ones just come out of what I have leftover in the refrigerator. I had everything but the olives for this one, and it turned out really delicious. You will see that I used shredded mozzarella cheese instead of cubes, because I have found that when I use mozzarella cubes, especially in something like pasta salad where it needs to sit and chill before serving, the cheese becomes mushy and loses it shape.

As with all pasta salads, adjust the amounts of the ingredients to your tastes, and the amount of dressing you use is subjective, depending on how you like it!

Antipasto Pasta Salad
from Colleen's Kitchen
makes about 4 servings

8 ounces rotini pasta
2 ounces pepperoni, sliced and quartered
4 ounces shredded mozzarella cheese
2.25 ounce can sliced black olives, drained
6 ounces roasted red peppers, drained and chopped
4 ounces sun-dried tomato dressing, plus more to taste
grated Parmesan cheese, to taste

Bring a medium pot of salted water to a boil, add rotini and cook until al dente 8-9 minutes. Drain and rinse with cool water. Add back to pasta pot.

Add remaining ingredients except Parmesan cheese, toss gently to combine. Cover and refrigerate 4-24 hours. Before serving, season to taste with Parmesan and more dressing if needed.

Sunday, March 29, 2009

Brunch Get-Together

It was time again to get together with my fabulous friends who love to cook as much as I do. We decided on a brunch theme this time, which was a nice way to usher in the first hints of spring!

Sarah started off the meal with a spring mix salad with blue cheese, fruit, nuts, and a homemade roasted tomato vinaigrette:

I made my chicken salad and brought some rolls to make mini-sandwiches:

Brooke made an awesome pasta salad that I must have had three servings of - tortellini, veggies, and fresh mozzarella cheese:

And then Lauren rounded out the meal with a simply amazing French toast stuffed with cream cheese, chocolate and strawberries:

Here is a pic of my plate (well, the first serving anyway), plus my separate plate of the French toast!

We missed you, Jenn and Katie!

Tuesday, March 24, 2009

Peanut Butter and Jelly Shortbread Wedges

I have been on a big peanut butter and jelly kick lately, so when I saw this recipe I knew I had to make it. It really takes no time at all, and is essentially a one-bowl recipe. The original recipe instructs you to freeze the dough that is reserved for the topping, and then grate it onto the shortbread itself. To me, that was a waste of time, so I just took the extra dough and crumbled it with my fingers so that it looked like this before baking:

This is a perfect little treat to have with tea, or a big glass or milk as a snack or for dessert. Use any flavor of jam you would like - and if you think you will have trouble spreading it on the crust, just zap it in the microwave for a few seconds to make it easier to spread.

Peanut Butter and Jelly Shortbread Wedges
slightly adapted from Culinary Concoctions by Peabody
Makes 8 wedges (or more)

nonstick baking spray
1/2 cup (1 stick) unsalted butter, room temperature
1/4 cup creamy peanut butter
1/2 cup sugar
large pinch of salt
1 teaspoon vanilla extract
1 1/4 cups all purpose flour
1/3 cup jelly (any flavor you want)

Preheat oven to 350 degrees F. Coat bottom of 9-inch-diameter springform pan with nonstick spray.

Beat butter and peanut butter in large bowl until smooth, about 2 minutes. Add sugar and salt and beat until fluffy, about 2 minutes. Beat in vanilla. Add flour; beat on low speed just until blended.

Reserve 1/3 cup dough. Press remaining dough evenly over bottom of prepared pan. Spread jam over dough in pan, leaving 1/3-inch plain border. Crumble reserved dough over the jam layer.

Bake shortbread until dough edge is deep golden and dough on top looks dry and baked through, about 40-50 minutes.

Cool shortbread completely in pan. Release pan sides. Cut shortbread into wedges and store in an airtight container at room temperature.

Thursday, March 19, 2009

Cheesy Chicken Broccoli Pasta

This was a great one-dish meal; and perfect for a night on the couch watching basketball! If you are making it from scratch, it does take a few pots and pans, but if you have leftover chicken or vegetables, it is a snap to make. I halved all of the amounts below and it was just enough for Chuck and I to have a hearty portion plus leftovers. Get ready to enjoy a fantastic cheesy pasta dish!

Cheesy Chicken Broccoli Pasta
from Katie of Good Things Catered
Makes 6 hearty servings

1 pound rigatoni
12 ounces Velveeta cheese, cubed
4 tablespoons butter, cubed
big splash of milk
1 1/4 cups shredded cheddar cheese
2 broccoli crowns, cut into pieces
1 1/2 pounds skinless, boneless chicken breast
1/2 teaspoon garlic powder
1/4 teaspoon paprika
1/4 cup bread crumbs (I used panko for more crunch)

Preheat oven to 350 degrees F. Lightly coat a 13 x 9 baking dish with cooking spray.

Wipe off chicken with a damp cloth, pat dry, and season with salt and pepper. Heat a little bit of olive oil in a large skillet over medium-high heat. Add chicken and saute until cooked through. Remove from pan and cut into bite-sized pieces.

Meanwhile, bring a medium pot of water to boil. Add broccoli and cook until bright green, about 2-3 minutes. Remove with slotted spoon and plunge into a bowl of ice water.

Bring a large pot of salted water to a boil and cook rigatoni until al dente, about 8-9 minutes. Drain and place back into pot.

Add Velveeta, butter, and milk to rigatoni and cook, stirring constantly, over low heat until almost melted completely. Add 1 cup shredded cheese and stir to melt until completely smooth.

Remove from heat, add garlic powder, paprika, chicken, broccoli, and stir to combine. Transfer mixture into prepared baking dish. Sprinkle with remaining 1/4 cup shredded cheese and bread crumbs.

Bake for 20 minutes or until heated through. Place under broiler for 3-4 minutes or until top is crispy and golden.

Tuesday, March 17, 2009

Shrimp, Tomato and Basil Orzo

This was a super simple, super delicious meal - I am so glad I made it! Cooking the shrimp and the sauce literally takes the same amount of time it takes the orzo to cook. I was tempted to add some heavy cream in at the end to make the dish a little richer, but I am glad I didn't, because this had a nice light, fresh flavor that I will be making again and again. I only used one can of tomatoes and the only other change I made was to leave out the onion, and that was just because I forgot to buy one! It was still great without it, but I will most likely add it back in the next time this makes my weekly rotation.

Shrimp, Tomato, and Basil Orzo
Makes 3-4 servings

8 ounces orzo pasta
1-2 tablespoons olive oil
1 small onion, chopped
2 cloves garlic, minced or crushed
1 (14.5 ounce) can diced tomatoes with garlic and basil (or garlic and onion), undrained
20 large shrimp, peeled and deveined
1/4 cup fresh basil, chopped or 4 teaspoons dried
kosher salt and coarse ground black pepper, to taste
crushed red pepper, to taste
1 1/2 tablespoons tomato paste
Parmesan cheese, to taste

Cook orzo according to package directions. Drain and set aside.

Meanwhile, heat the oil in a large skillet over medium-high heat. Add the onions and garlic, saute for 2 minutes. Add the shrimp and cook for 3 minutes more.

Add the diced tomatoes, basil, salt and pepper, red pepper, and tomato paste. Reduce heat to medium and cover skillet. Simmer for about 5 minutes until mixture is hot.

Add orzo and Parmesan cheese to skillet, mix thoroughly to combine.

Sunday, March 15, 2009

Irish Car Bomb Cupcakes

My parents have had a big bash to celebrate St. Patrick's Day for over 10 years now. It consists of 50 or more people enjoying good food, plentiful drinks, and friendly company at their house, with the dancing usually starting around midnight. :) It's always a fantastic time and I wouldn't miss it!

In recent years, my brother Brian has started the car bomb tradition, which consists of a shot glass half-filled with Jameson and half-filled with Bailey's Irish Creme dropped into a glass of Guinness. The trick is to drink it as fast as you can before the mixture curdles. Sounds like fun right? Well, there are usually about 10 or 12 people doing this at a time, at multiple points in the evening.

So when I saw this recipe, I decided it would be a neater, sweeter way to enjoy the elements of the car bomb. They consist of chocolate-based cupcakes made with Guinness:

then filled with chocolate ganache made with Jameson (or other Irish whiskey):
I was able to cut out the middles just using a paring knife and making a circle.

and finally iced with a buttercream icing rich with the taste of Bailey's:

These were certainly a hit - everyone loved them! I didn't make any adjustments from the original recipe so I am just going to link you to it here at Smitten Kitchen.

Next time I will most likely increase the amount of Jameson in the ganache to a tablespoon or two - many people reported that they couldn't even taste the Jameson in there at all. I also ended up having to make another half batch of icing - so start off make 1 1/2 times the recipe. Slainte!

And special thanks for Meg for icing!

Thursday, March 12, 2009

Smoky Red Rice and Chorizo with Black Beans

OK, first things first - when getting the seeds out of a serrano chile, please try as hard as you can not to actually touch the seeds. When I was making this last night, I had the brilliant idea that it would just be so much easier to take the seeds out by hand rather than struggle with a knife. WRONG! For the remainder of the night, my fingers itched; and any time I touched my face, either my nose started running or my eyes started tearing. The best part was actually this morning, when I tried to put my contacts in and it felt like my eyes were on fire for about 15 minutes. But don't worry, it's all better now, and the meal was very tasty!

Alright, now the second thing - my lovely friend Katie taught me how to set the white balance on my camera so that my pictures don't come out as yellow. Unfortunately, that means fooling with the aperture (I have no clue what these words really mean, so please don't ask me to clarify ;), which I do NOT know much about yet; and so that led to out of focus pictures. But again, don't worry, I am working on how to fix that as we speak.
Is ANYthing clear in this pic?

And now to the food! This meal was fairly simple to throw together. I loved all the spicy flavors; and except for the chorizo, this dish is pretty healthy as well! The original recipe says it makes 4 servings, but it gave us two larger servings with a few leftovers (yeah, we eat a lot). If you don't like heat, leave out one of both of the serrano chiles. I had to add some sour cream to the finished product because it was borderline too spicy for me!

Spicy Red Rice with Chorizo and Black Beans
Makes 2 servings with leftovers
1 3/4 cups chicken broth
1 cup white rice
2 jarred roasted red peppers, drained
1/3 cup flat-leaf parsley, finely chopped, or about 3 teaspoons dried parsley
1 teaspoon paprika
olive oil
3/4- to 1-pound package Spanish chorizo, cut on an angle into 12 slices
2 serrano chiles, seeded and chopped
1/2 medium onion, chopped
2 cloves garlic, chopped
1 15-ounce can diced fire-roasted (if you can find them, otherwise regular is fine) tomatoes, drained
1 15-ounce can black beans, drained and rinsed
Salt and pepper

Bring the chicken broth to a boil in a medium pot. Add the rice, cover, lower the heat and simmer for 15 minutes, or until most of the liquid has been absorbed.

Using a food processor or mini-chopper, puree the roasted red peppers. Stir the puree into the rice along with the parsley and paprika. Cover, turn off the heat and let stand for 5 minutes.

Meanwhile, in a large skillet, heat about a tablespoon of olive oil over medium-high heat. Add the chorizo and cook until crisp, turning, about 3-4 minutes on each side. Remove and place on paper towels to drain.

Add the chiles, onion and garlic to the same skillet and cook until tender, about 5 minutes. Turn heat to low and stir in the tomatoes, beans, and chorizo; season with salt and pepper and cook until heated through.

Spoon each serving of rice into a bowl and top with the bean mixture. Sprinkle with parsley if desired.

Tuesday, March 10, 2009

Spinach-Artichoke Bites and an Award!

I think it's pretty safe to say that Spinach-Artichoke dip is one of my all-time favorite snacks. So when I saw the recipe for that dip in bite-sized form, I saved it right away! Not to mention I already had some extra wonton wrappers just hanging out in my fridge.

These were very tasty, although I need to find a way to make the wontons a little crisper. I baked them as long as I could, but didn't want to burn them, so maybe brushing with an egg wash around the edges before baking? I will have to try it out and get back to you, but still, make these soon!

Spinach-Artichoke Bites
adapted from Daily Deliciousness
Makes 30 bites

30 wonton wrappers
1 package (8 ounces) cream cheese, softened
1 box of frozen chopped spinach, thawed and drained
4 ounces marinated artichokes, drained and chopped
1 cup shredded mozzarella cheese
1/3 cup mayo
1/2 teaspoon black pepper
dash of salt
1 teaspoon garlic powder

Preheat oven to 350 degrees F. Lightly coat mini-muffin tins with cooking spray.

Mix cream cheese, spinach, artichokes, shredded cheese, mayo, and seasonings in a medium sized bowl.

Line prepares mini-muffin pan with wonton wrappers, lightly pressing into place to form a cup. Using a small spoon, fill each cup with mixture almost to the top.

Bake for 10-12 minutes, until edges are browned and crisp and the filling is hot and melty.
Let cool for about 5 minutes before serving.
All ready to go into the oven!

I was very surprised to receive the Blogging with a Purpose Award from Nicole of Test Kitchen Recipes! Thank you, Nicole - keep up the good work on your blog!

Monday, March 9, 2009

Black Bean and Rice Enchiladas

I was actually looking for something to make on Ash Wednesday when I found this recipe (and yes, I am aware the gravy has chicken broth, I would have made it with vegetable broth). But then Ash Wednesday came and went with some other meal, and I still had all of the ingredients for this, so I ended up making it on a Monday, hoping I could pass it by Chuck without him realizing there was no meat in it. A few forkfuls into dinner, I made the announcement that it only had beans and rice and Chuck said he didn't even realize it was meatless! So that means success to me!

The chili gravy on these was a great flavor, not like any other sauce I have made before for enchiladas. The recipe below makes 2 cups, but you only need 1 1/2 cups. So I adjusted as I was cooking to only make what I needed. However, those measurements would have read something like "a little less than a 1/2 teaspoon of so-and-so", so I just wrote you the original. Additionally, beans, rice, and cheese combined to make a very tasty filling. There are about a million people (or four) to cite on this recipe so I am going to try my best here!

Black Bean and Rice Enchiladas
adapted from The Shannon's Kitchen, who modified it from Amber's Delectable Delights
Makes 6 enchiladas

1/2 cup chili gravy, recipe below
6 (10-inch) flour tortillas

2 cups brown rice cooked as directed
1 can black beans, rinsed and drained
1/2 cup jalepeno peppers, finely chopped (can be from a can)
1 cup shredded Mexican blend cheese (or any combination of cheddar and Monterey Jack)
1/2 cup sour cream

1 cup chili gravy, recipe below
1/2 cup shredded Mexican blend cheese, or other option

Preheat oven to 350 degrees F. Spread 1/2 cup chili gravy over the bottom of a 13 x 9 baking dish.

In a medium bowl, mix cooked rice, beans, jalapeno peppers, 1 cup cheese, and sour cream.

Lay each tortilla flat and fill with 1/2 cup of rice and bean mixture. (Microwaving the tortillas for 10-15 seconds helps with folding.) Fold top and bottom inward and fold the sides over. Lay seam side down in the prepared baking dish. (You may have some filling leftover.)

Repeat until all 6 tortillas are filled and top with 1 cup chili gravy and 1/2 cup shredded cheese.

Cover the dish with foil at bake for 25 minutes. Remove foil and bake additional 5 minutes. Serve with extra sour cream and salsa, if desired

Chili Gravy
makes 2 cups

1/4 cup canola or vegetable oil
1/4 cup flour
1/2 teaspoon black pepper
1/2 teaspoon salt
1 1/2 teaspoons garlic powder
2 teaspoons ground cumin
1/2 teaspoon dried oregano (Mexican oregano is preferred)
2 tablespoons chili powder
1 pinch ground cayenne pepper
1 pinch red pepper flakes
2 cups chicken broth

Heat the oil in a skillet over medium-high heat. Stir in the flour and continue stirring for 3 to 4 minutes, or until it makes a light brown roux.

Add all the dry ingredients and continue to cook for 1 minute, constantly stirring and blending ingredients. Add chicken broth or water, mixing and stirring until the sauce thickens.

Turn heat to low and let sauce simmer for 15 minutes. If desired, add water to adjust the thickness.

Sunday, March 8, 2009

Chicken Cacciatore Ravioli Stew

This was a great little recipe that was fairly easy to make for my lunches this week. I love the idea of sauteeing the mushrooms in the rosemary and thyme to give the soup a richer flavor base. And this made a TON of soup, which gave me lots of leftovers to put in my freezer for another week!


I used less than the amount of chicken the recipe recommends, and there really wasn't enough. So I would suggest using the full pound of chicken, which I boiled and shredded into bite-sized pieces. This soup has so many delicious flavors, you could even leave out the ravioli if you were watching carbs (but I wouldn't)!

Chicken Cacciatore Ravioli Stew
slightly adapted from The Sisters' Cafe
Makes 6-8 servings


3 cloves garlic
2 tablespoons extra-virgin olive oil
1 teaspoon dried rosemary leaves
1 teaspoon dried thyme leaves
1 cup fresh mushrooms, sliced
Salt and pepper
1 (15-ounce) can stewed tomatoes with peppers, onions and celery
2 roasted red peppers, drained and finely chopped
8-ounce can tomato sauce
1 package chopped frozen spinach, thawed and squeezed dry
6 cups chicken broth
3/4 to 1 pound chicken breasts, boiled and shredded
14-ounce package bite-size cheese ravioli
shredded Parmesan cheese, for servings


Heat olive oil in a large soup pot over med-high heat. Add minced/pressed garlic and rosemary and thyme. Add the mushrooms, and stir occasionally, 3-5 minutes, seasoning with salt and pepper.


Add stewed tomatoes with their juices and roasted red peppers. Break the tomatoes up a little bit with your spoon. Add spinach, tomato sauce and chicken broth. Stir until the spinach is all broken up in the broth.


Add the shredded chicken and bring liquid to a boil. Add the ravioli and cook until al dente, 4-5 minutes or according to package instructions. Serve with Parmesan cheese and Italian bread if desired.

Thursday, March 5, 2009

Chicken Parmesan Pizza

What's better than combining chicken parm with PIZZA? You get the best of both worlds! I chose to put sliced fresh mozzarella on this rather than shredded and I am glad I did. I think it makes it seem more like an actual chicken parm with the sliced cheese, and more delicious! Breaded chicken is one of my all-time favorite foods (which may be why Chuck makes it for me), so I will definitely be making this pizza again. The amounts of ingredients below are what I used, but feel free to use more or less depending on your tastes.

And once again, I apologize for the pics...I was doing way too much at one time!

Chicken Parmesan Pizza
from Colleen's Kitchen
Makes 1 pie

1 recipe pizza dough
3/4 to 1 pound chicken breasts, pounded thin
2 eggs, beaten
1 cup seasoned bread crumbs
olive oil
1 cup marinara sauce, either homemade or store-bought
6 ounces fresh mozzarella, sliced
basil and oregano, to taste

Preheat oven to 500 degrees F. If you have a pizza stone, place it in the oven and heat it for 30 minutes. Or line a large baking sheet with parchment paper (do not preheat).

In a large skillet over medium-high heat, heat enough olive oil to cover the bottom of the pan (don't skimp). Dip chicken in egg to coat, then breadcrumbs, and add to hot skillet. Cook until golden-brown on each side and chicken is cooked through. (If your chicken is thin enough, by the time the crust is golden-brown, it will be cooked through anyway). Remove chicken from pan and blot with paper towels. Cut into bite-sized pieces.

Roll pizza dough out on a lightly floured surface. Spread with marinara sauce, then evenly scatter slices of mozzarella. Top with chicken pieces and sprinkle with basil and oregano.

Transfer dough to preheated pizza stone, if using, and bake for 15 minutes or until crust is crispy and golden.

Roasted Garlic and Herb Pizza with Artichokes and Sundried Tomatoes

I got the inspiration for this idea from the fabulous Katie (and I apologize for the pictures, I had some hungry guests waiting for me!). I was looking to do a cheese-less pizza as one of my options for Pizza Night and she suggested a garlic-herb topping with some veggies.

So after thinking about it for awhile, I decided to roast the garlic first, then combine with some herbs and more olive oil. I only roasted one head of garlic, thinking it would be overpowering, but actually the roasting sweetens up the garlic so much that I didn't get the full taste I was looking for. Therefore, the below recipe has my recommendation for TWO whole heads of garlic - don't be shy! I then chose artichokes and sundried tomatoes because I love those two flavors together, but get creative! Roast some tomatoes of your own, use some arugula, maybe some sauteed zucchini; your options are limitless!

Roasted Garlic and Herb Pizza with Artichokes and Sundried Tomatoes
from Colleen's Kitchen
Makes 1 pie

1 recipe pizza dough
2 heads garlic, stems cut off so that all cloves are exposed (see here for pic)
olive oil
1 teaspoon dried basil
1 teaspoon dried oregano
1 small jar marinated artichoke, drained and chopped
1/2 cup sundried tomatoes in oil, drained and chopped

Preheat the oven to 375 degrees F. Line a small baking dish with foil. Liberally pour olive oil over both heads, making sure that all the cloves are covered. Bake for 30-40 minutes until golden brown and cloves are soft and mushy.

When garlic is cool enough, squeeze each clove into a small bowl and mash with fork to desired cosistency. Add about 3-4 tablespoons olive oil and the dried herbs. (This can be done in advance.)

Increase oven temperature to 500 degrees F. If you have a pizza stone, place it in the oven and let it sit at 500 degrees for at least 30 minutes. If not, line a large baking sheet with parchment paper (do NOT preheat this).

Roll out prepared pizza dough to desired shape. Spread garlic and oil mixture over the top of the dough (a pastry brush helps). Sprinkle with chopped artichokes and tomatoes.

Transfer to pizza stone and bake for 15 minutes or until crust is golden brown and crispy.

Wednesday, March 4, 2009

200th Post and Colleen's Caramelized Onion Dip


Wow, I can't believe I have reached 200 posts in a little over 6 months of blogging! I hope all of you have enjoyed reading them as much as I have cooking and posting them! I read each and every one of your comments and appreciate them all.


This dip is my own creation and it was gone so fast that I barely had leftovers! It is relatively simple to make, you just have to allow time to caramelize the onions. This picture shows the onions barely caramelized:

and that took about 40 minnutes on my stove! You can make the dip with the onions like that, or keep going until they get darker - the flavor will just get richer the longer that you cook them. I served this with kettle-cooked potato chips, but it would also be delicious with any kind of pretzel, cracker, or raw cut veggie. Enjoy and thank you for reading!!


Colleen's Caramelized Onion Dip
from Colleen's Kitchen
Makes 8-10 appetizer servings


1 very large sweet onion, coarsely chopped
olive oil
1 (8-ounce) block low-fat cream cheese
1 cup low-fat mayo
1 cup white cheddar cheese, shredded
dash of garlic powder
kosher salt and coarse ground black pepper, to taste


Heat enough oil to cover the bottom of a large skillet over medium-high heat. Add onions and cook until edges begin to turn golden, 5-10 minutes. Turn heat to medium-low and continue cooking until caramelized, stirring often, about 40-50 minutes.


Turn heat to very low and add remaining ingredients, stirring to combine. Remove from heat when all cheeses are melted.


Preheat oven to 400 degrees F. Put mixture in a 1 1/2 quart baking dish and bake for 20 minutes, or until cheeses are bubbly and top is turning golden brown.


Serve with crackers, pretzels, potato chips, raw veggies, or anything else you can think of!

Tuesday, March 3, 2009

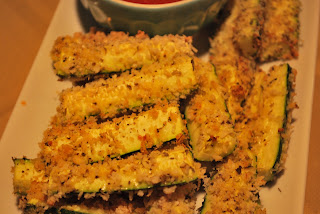
Parmesan-Crusted Zucchini Sticks

When I choose appetizers to serve at a get-together, I often turn towards the hot dips or something heavy with carbs and/or cheese (who doesn't like that, right?). So when I was planning my Pizza Night menu, I knew that I wanted to do something a little lighter since the actual meal was basically carbs and cheese itself!


These little guys popped up in my Google Reader and they looked perfect - veggies PLUS served with a tomato-based sauce to fit into the pizza theme. They were a great little snack coated with bread crumbs and cheese (ok so I can't totally get away from that!). The only things I would do differently next time is season the zucchini more before coating them and drizzle with a little olive oil before baking so they don't turn out as dry.


Parmesan-Coated Zucchini Sticks
slightly adapted from For the Love of Cooking via Closet Cooking
Makes 4-6 appetizer servings


1/2 cup panko bread crumbs
1/2 cup grated Parmesan cheese
1 teaspoon oregano
1 pound zucchini (about 2 large)
salt and pepper to taste
1 egg (lightly beaten)
olive oil
marinara sauce, either store-bought or homemade


Preheat oven to 425 degrees F. Line a large baking sheet with foil.


Slice the washed zucchini into wedges, then pat wedges dry so all excess moisture is removed. Season zucchini liberally with salt and pepper.


Mix bread crumbs, Parmesan cheese, and oregano in a shallow bowl. Place egg in another shallow bowl. Dip zucchini in the egg, then the bread crumb mixture, place on baking sheet.


Drizzle with olive oil and bake for 20-25 minutes, until golden brown. Serve with warm marinara sauce.

Monday, March 2, 2009

Tortellini, Mozzarella, and Tomato Skewers

This recipe isn't even really a recipe, you just need to make sure you have enough of each ingredient to feed your guests. It's so quick and easy to prep and assemble; and personally, I think it looks pretty impressive to set out in front of your company! The amounts below are all approximate - the key is to have an equal number of bocconcini (small bites of fresh mozzarella), tomatoes, and tortellini. For a pint of tomatoes, you will need about 3/4 lb. of bocconcini, 10 ounces of tortellini, and 20 skewers. Enjoy!


Tortellini, Mozzarella, and Tomato Skewers
from Colleen's Kitchen
Makes as much as you want!

equal amounts of:
frozen cheese-filled tortellini
cherry or grape tomatoes
bocconcini (small mozzarella, usually found around the deli section in the olive bar)

your favorite Italian dressing or vinaigrette
skewers
chopped fresh basil

Bring a pot of salted water to a boil and add tortellini. Cook 4-5 minutes until al dente, or as directed on the side of the package. Drain tortellini and rinse with cold water.

Cut each tomato and bocconcini in half. Combine cooled (important so you don't melt the cheese!) tortellini and tomato and bocconcini halves in a large, sealable container. Liberally add dressing of choice. Seal and marinate 4-24 hours in the refrigerator, shaking several times so that dressing is equally distributed.

Assemble each skewer: tortellini, tomato, bocconcini, tortellini, tomato, bocconcini. Sprinkle with chopped basil and serve.

Sunday, March 1, 2009

Delicious Turkey Burgers

I love this turkey burger recipe. It takes very little time to put together and turns out a moist, delicious burger that you feel healthy while eating! This is adapted from a recipe I have scrawled in my recipe book so I am not sure exactly where the original came from.

If you don't have an outdoor grill available to you, you can make these in a nonstick skillet or cast iron pan on the stove. Just make sure they are cooked all the way through - no one wants a rare turkey burger!

Delicious Turkey Burgers
adapated from an old recipe
Makes 4 burgers

1 1/3 pounds turkey (standard ground turkey package)
2 tablespoons seasoned bread crumbs
1/4 medium onion, minced
1 egg, beaten
2 tablespoons chopped fresh parsley
1 garlic clove, minced
salt and pepper

Put all ingredients in a large bowl. Mix together (just using your hands is best for this) until just combined. Form into 4 patties, all roughly the same size to ensure even cooking.

Grill over medium heat, 6-8 minutes per side, depending on thickness.

with all the fixin's!