Thursday, February 26, 2009

Parmesan-Crusted Pork Chops

This is my go-to recipe for pork chops. The cheese and breadcrumbs give the chops a fantastic crust, and the flavors go with almost any side dish you choose! I served these with the Baked Orzo with Fontina and Peas and green beans with sweet and sour dressing.

I always halve the recipe that is below when cooking for just the two of us. And my chops were a wee bit thick this time as you can see in this picture:

The crust is already nice and brown but the chops are still very pink inside. Make sure you have a meat thermometer to keep checking the internal temperature - it should be at least 165 degrees F before you take them off the heat.

Parmesan-Crusted Pork Chops
Makes 4 servings

2 large eggs
1 cup dried Italian-style bread crumbs
3/4 cups freshly grated Parmesan
4 (1/2 to 3/4-inch thick) center-cut pork loin chops (each about 10 to 12 ounces)
Salt and freshly ground black pepper
6 tablespoons olive oil
lemon wedges, for serving (optional)

Whisk the eggs in a shallow bowl to blend. Place the bread crumbs in another shallow bowl. Place the cheese in a third bowl. Sprinkle the pork chops generously with salt and pepper. Coat the chops completely with the cheese, patting to adhere. Dip the chops into the eggs, then coat completely with the bread crumbs, patting to adhere.

Heat 3 tablespoons of oil in a very large skillet over medium heat. Add pork chops, in batches if necessary, and cook until golden brown and the center reaches 150 degrees, about 6 minutes per side. Transfer the chops to plates and serve with lemon wedges, if desired.

Wednesday, February 25, 2009

Pizza Night!


Sometimes you just want a dinner party to be an easy, no-stress meal, yet still impressive. Homemade pizza is the perfect way to do that. There are ENDless possibilites of what you can top a pizza with, and most of it can be prepared even before your guests get there!

Make sure to have lots of snack and drinks on hand as well, along with several games to play since you will be spending so much time OUT of the kitchen!

Pizza Night!

Appetizers

Dinner

Dessert

  • Frosted cookie dough brownies

Come back soon for the recipes!

Tuesday, February 24, 2009

Baked Orzo with Fontina and Peas

This is a nice, easy pasta bake that you can make quickly for a weeknight meal or serve with an impressive dinner! I halved the original amounts the recipe calls for since it was only the two of us eating it. That still gave us a hearty 4 or more servings though when I served it as a side dish with Parmesan Pork Chops (coming tomorrow!) and a green salad.


The recipe is originally from Giada but I found it through Lauren's Kitchen who got it from Elizabeth's Edible Experience. All of us liked it a lot - the sauteed mushrooms and onions combined with the Marsala wine give a wonderful rich flavor that combines nicely with the peas and the cheeses. If you can't find fontina, no worries, just use more mozzarella! Also, the breadcrumbs on top were not crisp enough for me so next time I may mix them with a little melted butter to make it even more delicious!

Baked Orzo with Fontina and Peas
modified from Giada DeLaurentiis
Makes 4 hearty side dish servings


2 cups chicken broth
1/2 pound orzo pasta
1 1/2 tablespoons butter
1/2 onion, chopped
4 ounces mushrooms, sliced
1/2 cup Marsala wine or chicken stock
1/4 cup heavy cream or milk
1/2 cup (2 ounces) shredded fontina
1/2 cup (2 ounces) mozzarella cheese, diced
1/2 cup frozen peas, thawed
1/4 teaspoon salt
1/4 teaspoon freshly ground black pepper
1/4 cup bread crumbs
2 tablespoons grated Parmesan
1/2 teaspoon dried thyme


Preheat the oven to 400 degrees F. Coat an 8 x 8 baking dish with cooking spray.


Bring the chicken broth to a boil over medium-high heat in a medium saucepan. Add the orzo and cook until almost tender, about 7 minutes. Remove from heat and set aside.


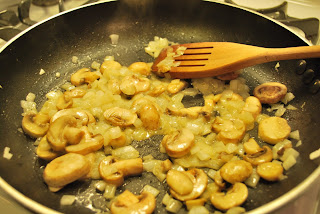
Meanwhile, melt the butter over medium heat in a medium skillet. Add the onions and saute until tender, about 3 minutes. Add the mushrooms and continue to saute until the mushrooms are beginning to turn golden around the edges, about 7 minutes. Add the Marsala. Scrape the brown bits off the bottom of the pan and cook until the Marsala has reduced by half, about 5 minutes.


Add the orzo with broth to the mushroom mixture. Add the cream, fontina, mozzarella, peas, salt, and pepper. Stir to combine. Pour the mixture into the prepared baking dish.


In a small bowl combine the bread crumbs, Parmesan, and dried thyme. Sprinkle the bread crumb mixture on top of the pasta. Bake until golden, about 25 minutes.

Monday, February 23, 2009

Zesty Broccoli Casserole

I wanted to make a nice Sunday night dinner so I decided to make my first ever roast chicken. I really don't know why I was afraid because once I got past my initial fear of the whole bird, it was easy and delicious. I am still working on some tweaks of the recipe so posting that may take awhile. But when thinking of sides, mashed potatoes came to mind as well as this delicious casserole that Sarah had brought to our Christmas get-together.

I made the recipe the way that Sarah suggested it - she made a few modifications after she found out about it from Jenn and it was really good! I halved the recipe for Chuck and myself so I will give you those amounts below. Chuck thought it was a little too saucy (although I can never have too much cheese) so if you like it with a lot of cheese sauce use two broccoli crowns and if you want a little more veggie with your sauce, use three crowns. I also didn't use the water chestnuts but I think they would be a fantastic addition and give a nice crunch!

Zesty Broccoli Casserole
Makes 3-4 servings

2-3 broccoli crowns, cut into bite-size pieces
2 tablespoons butter, divided
3/4 cup milk
1 1/4 tablespoons flour
1/4 teaspoon salt
1/8 teaspoon pepper
Pinch of nutmeg
1/4-1/2 cup shredded sharp cheddar cheese
1/4 cup cream cheese, softened
1/2 cup mayonnaise
1/4 medium onion, chopped
1/2 can (8-ounce) sliced water chestnuts, drained
6 tablespoons panko (Japanese breadcrumbs)

Preheat oven to 375 degrees F. Coat a 1 1/2 or 2 quart casserole (depending on how much broccoli you use) with cooking spray.

Melt one tablespoon butter in a large saucepan over medium-high heat then add flour. Cook for 1 minute, then add milk, salt, pepper and nutmeg; bring to a boil. Cook 1 minute or until thick, whisking constantly. Remove from heat.

Add cheddar and cream cheeses; stir until smooth. Stir in mayonnaise, onion, and water chestnuts. Spoon cheese mixture evenly over broccoli.

Melt remaining tablespoon butter. In small bowl, combine panko with butter. Sprinkle breadcrumb mixture evenly over broccoli mixture. Bake for 25 minutes or until mixture begins to bubble and breadcrumbs brown.

Sunday, February 22, 2009

Raspberry Strippers

The name of this recipe is just ridiculous, but I didn't change anything about it so I can't change the name either! I was looking for a little cookie or cake to go with coffee and tea and this seemed to fit the bill! I was a little worried about having to roll the dough out, but it was very workable so it wasn't a problem at all.

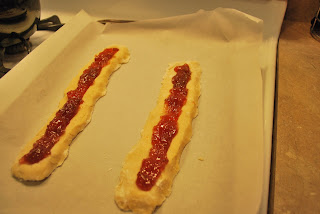
Before baking:

Use any flavor of jam or jelly that you like for these, you can't go wrong. Try to match up the flavor of the jam with the extract you use for the icing - maybe use orange extract with strawberry jam or something similar to mix it up!


I made the recipe exactly as the original called for so you can find it here. Enjoy!

Saturday, February 21, 2009

Weeknight Paella

I have always been hesitatant to make paella, for several reasons. First and foremost was the fact that I would have to purchase saffron, the most expensive spice in the world! Saffron is the stigma of the flowering crocus. They must be gathered by hand, and each blossom only has 3 stigmas. It takes 225,000 stigmas to make a pound of saffron, so you can see why it costs so much! It gives dishes such as paella that traditional yellow color.

So besides that, I knew that paella also contained a lot of different types of seafood and I thought it took forever to make. That was until we made paella in my cooking class. I was lucky enough to sign up for a five-class series where we learned all sorts of great things, including braising, roasting, sauteeing and many other things, with a chocolate souffle thrown in here and there! Our instructors, Catherine and Mike were very helpful in answering all of our questions! Fortunately, there was room left in their second series of classes so I will be returning!

Catherine wrote all of the recipes that we made, and I took her paella recipe and adapted it so that it was a little easier on the wallet. Most notably, I used yellow rice instead of white rice plus saffron. When I bought the rice I didn't realize that it already has spices in it, but it all worked out in the end. I also only used shrimp and chorizo, even though Catherine recommends everything from scallops to clams to mussels - use anything you like!

This was also SO easy to make - you just toast the rice (a la risotto style), add the broth and proteins, and leave it alone! Chuck loved this and I will definitely be making it again soon!


Weeknight Paella
adapted from Catherine Titus Felix at Classic Thyme
Makes 2 servings

2/3 cups yellow rice (Goya)
1 1/2 tablespoons olive oil
1 small shallot, chopped
1 clove garlic, minced
1/2 pound large shrimp, shelled and deveined
1/2 pound chorizo, sliced
1 cup plus 2 tablespoons chicken broth
1 tablespoons fresh parsley, chopped
1/3 cup frozen peas

Heat olive oil in large saute pan over medium-high heat. Add rice and cook until it begins to toast, about 1-2 minutes.

Add shallot and garlic and continue to saute until garlic is fragrant, about 1 minute.

Add shrimp, chorizo, and broth. Cover pan tightly and reduce heat to medium-low. Cook for 18 minutes.

Remove lid, add parsley and peas and cook until heated through. Continue cooking uncovered until all liquid is absorbed.
No peeking for 18 minutes!

Thursday, February 19, 2009

Baked Ziti

Our friends Jenn and DJ just recently had a beautiful baby boy; so I went into my automatic "what can I make for the new parents" mode, and made the decision to bring them baked ziti. I actually make this for a lot of my friends who have new babies; because it's so easy to make, transport, and reheat - and it's absolutely DELICIOUS.

Chuck does not like ricotta cheese so when I went searching long ago for a baked ziti recipe and found this one with no ricotta I saved it right away. You don't even miss the ricotta though - with provolone, mozzarella, Parmesan, and sour cream adding all their cheesey and creamy flavors to this dish.

If you are going to split this into two separate meals, either to bring to someone else or to freeze, use 2 8 x 8 (or 9 x 9) baking dishes. You can see here that I used an 8 x 8 for us and had a slightly larger one for the new mom and dad, but it worked out fine. Do not bake the one that you are saving/giving away - just refrigerate after assembly. Then bring it to room temperature when ready to eat and cook as directed.


Baked Ziti
slightly adapted from allrecipes.com
Makes 8 servings

1 pound dry ziti pasta
1 - 1 1/3 pounds lean ground beef
1 onion, chopped
2 (26 ounce) jars marinara sauce (when I don't use my own I like Prego)
6 ounces sliced provolone cheese (8 slices)
1 1/2 cups sour cream
8 ounces (2 cups) shredded mozzarella cheese
1/8-1/4 cup grated Parmesan cheese

Preheat oven to 350 degrees F. Spray one 13 x 9 baking dish or two 8 x 8 (or 9 x 9) baking dishes with cooking spray.

Bring a large pot of lightly salted water to a boil. Add ziti pasta, and cook until al dente, about 8 minutes; drain.

In a large skillet, brown onion and ground beef over medium heat. Drain fat if necessary. Add marinara sauce, simmer 15 minutes.

If using a 13 x 9 dish layer as follows: 1/2 of the ziti, Provolone cheese, sour cream, 1/2 sauce mixture, remaining ziti, mozzarella cheese and remaining sauce mixture. For an 8 x 8 dish layer each dish with 1/4 of the ziti, 4 slices Provolone cheese, 1/2 of the sour cream, 1/4 sauce mixture, 1/4 of the ziti, 1/2 of the mozzarella cheese, and 1/4 of the sauce mixture.

Top with grated Parmesan cheese. Bake for 30 minutes, or until heated through and cheeses are melted.

Nothing says comfort food like a pot of pasta and a sauce simmering...

Welcome to the world, Beckett!

Wednesday, February 18, 2009

Coconut Snowflakes

So these were on my list of Christmas treats to make and I just never got around to them. I made them for Christmas 2007 and really liked them, so when I recently found some extra coconut in my pantry, I decided that these were the perfect fit!

The original recipe calls for these to be made into sandwiches with vanilla filling, which would be nice if you were making these for a special occasion; but I think keeping these as individual cookies is just fine for hanging around in the cookie jar. These cookies have a delicious buttery, sugary taste to them, all with a perfect amount of coconut in each bite. I just had one with breakfast!

Coconut Snowflakes
adapted from Everyday Food
Makes about 36 cookies

2 cups all-purpose flour (spooned and leveled)
1/2 teaspoon baking powder
1/2 teaspoon salt
1 3/4 cups sweetened shredded coconut (about 6 ounces)
3/4 cup (1 1/2 sticks) unsalted butter, room temperature
1/2 cup granulated sugar
1/2 cup packed light brown sugar
1 large egg
1 teaspoon pure vanilla extract

Preheat oven to 350 degrees F, with racks set in upper and lower thirds. Line three baking sheets with parchment paper.

In medium bowl, whisk together flour, baking powder, and salt.

In food processor (or in a mini-chopper, working in batches), pulse coconut until coarsely ground.

Beat butter and sugars in large bowl with an electric mixer until light and fluffy. Beat in egg and vanilla. Add flour and coconut in batches, mix on low until just combined.

Drop dough (using a tablespoons or medium-sized cookie scooper) onto baking sheets, 1 to 2 inches apart. Bake until lightly golden around edges, 10-12 minutes, rotating sheets between racks halfway through baking time.

Let cookies rest 10 minutes, then transfer to wire racks to cool completely.

Tuesday, February 17, 2009

Jalapeno Popper Dip

This recipe caught my eye because it is super-easy to put together; and it gives you the taste of those fabulous little jalepeno poppers! The original recipe calls for microwaving the dip, which I was very against, because you don't get that "baked" feeling after three minutes in the microwave! So I suggest baking it in the oven until the cheese is melted.

And speaking of the cheese, as you can see by my picture below I actually used the "green can" Parmesan cheese for this (gasp!). I thought it would taste better than the finely grated block of Parm I have in my fridge, but there was just too much of it. So when you make this, I suggest freshly grating your cheese or just use shredded cheddar or Monterey Jack. Enjoy!

Jalapeno Popper Spread
slightly adapted from allrecipes.com
Makes enough to feed a crowd

2 8-ounce packages cream cheese, softened
1 cup low fat mayonnaise
1 4-ounce can diced green chilies, drained
1/2 of 7.5-ounce can jalapeno peppers, drained and chopped
1 cup freshly grated Parmesan cheese or 1 cup shredded cheddar/Monterey Jack
Preheat oven to 350 degrees F.

In large bowl, use a handheld mixer to blend cream cheese and mayo until smooth. Stir in green chiles and jalapeno peppers.

Spread into a 9-inch pie plate. Top with Parmesan or shredded cheese. Bake for 20 minutes or until cheese is melted. Serve immediately with tortilla chips.

Monday, February 16, 2009

White Truffle Risotto

Any variation of risotto pretty much follows a basic recipe and then you can add any ingredients that you want to it; provided that you cook them correctly first. Chuck told me that he was going to grill some filets and asparagus for our Valentine's Day dinner, and we both thought that risotto would be a nice side dish.

White truffles are a variety of highly esteemed underground fungi that are found in Italy (Wikipedia). They are extremely expensive and should be used only with the utmost care and restraint. So for those of us who want the flavor of the white (or black) truffles without the price; we can buy truffle oil. To some people's surprise, most truffle oil does not contain any actual truffles, but is an olive oil that has been synthetically flavored.

So I had a bottle of white truffle oil in my pantry and decided to turn my basic risotto into white truffle risotto. I have never tasted white truffles before, and even with the "synthetic" flavoring, it was still delicious. It added a delicate, buttery taste to the risotto that we really liked. Find it at gourmet stores or search for it on the internet!

White Truffle Risotto
from Colleen's Kitchen
Makes 2 servings

1 14.5-ounce can low-sodium chicken broth
1 tablespoon olive oil or butter
1/2 medium onion, finely chopped
kosher salt and coarse ground black pepper
1 garlic clove, minced
1/2 cup Arborio rice
1/4 cup dry white wine
1 tablespoon butter
1 tablespoon white truffle oil
1/4 cup freshly grated Parmesan cheese, or to taste

Combine broth and 1 cup water in medium saucepan; keep warm over low heat.

Heat olive oil in large saute pan over medium-high heat. Add onions, season with salt and pepper, and cook until almost transclucent and becoming tender, 3-5 minutes. Add garlic and cook 1 minute more.
Add rice and cook, stirring, about 1 minute. Add wine and cook, stirring, until almost absorbed, about 1 minute.

Add 1 cup warm broth mixture to rice mixture. Cook, stirring frequently until absorbed. Continue to add broth, 1 cup at a time, stirring frequently and allowing broth to absorb completely before adding more. Continue cooking until rice is al dente, about 25-30 minutes total. (You may not need to use all the broth and the cooking time will vary - there is a moment where you see the rice "bloom" and become creamy. Taste it often!)

Remove risotto from heat. Add butter, white truffle oil, and cheese. Stir until completely combined and season to taste with salt and pepper. Serve immediately.
Still learning how to lighten the pictures:

After the first cup of broth is added. Stir frequently until this is almost absorbed.

Sunday, February 15, 2009

Happy V-Day to me!!

Well, ladies and gentlemen, he finally caved:

Chuck bought me a Nikon D60 for Valentine's Day! I don't really know much about it yet, but I will force myself to read the instruction manual so that I know exactly what this camera can do. I took some pictures at dinner last night so stay tuned for that blog post!

Next step: light box!

In other gift news, I was surprised to find out that I won a prize in the blog giveway over on Priscilla's Baking Adventures. Priscilla is an amazing 17-year-old girl who blogs about drool-worthy food and she just had a giveaway for her one-year blogaversary!

I ended up winning this beautiful personalized bracelet from Jewelry by Jennifer Casady. Thanks again Priscilla and keep up the good work!

Friday, February 13, 2009

White Chocolate Layer Cake with Raspberry Filling

I have to give ALL the credit for this wonderful dessert to my fabulous sister, Meghan. She found the recipe, baked the cake, and had the patience to layer it and decorate it; something that I certainly couldn't have done. Throughout the entire birthday dinner shopping and prep, Meg was a major help and I couldn't have done it without her! It was a fun, yet tiring day in the kitchen - here she is during her mid-prep red wine break:

This cake was really good - my mom loves buttercream I think more than she loves us sometimes; so this was the perfect choice for her. Between the white chocolate in both the cake and the icing, to the raspberries in the filling; it's a winner all around! Just make sure to leave yourself enough time to bake the cakes, allow them to cool, and then ice them. Enjoy!

White Chocolate Layer Cake with Raspberry Filling
Makes 10-12 servings

Cake:
12 ounces white chocolate, broken up into pieces (we used white chocolate chips)
¼ cup milk
2 cups all purpose flour
¾ teaspoon baking soda
½ teaspoon salt
¼ teaspoon baking powder
¾ cup sugar
½ cup (1 stick) butter, softened
1 teaspoon vanilla extract
4 eggs
¾ cup sour cream

Raspberry Filling:
1 ½ cups heavy or whipping cream
¾ cup fresh or thawed frozen raspberries
3 tablespoons sugar

White Buttercream:
6 ounces white chocolate, broken up into pieces (this needs to be good quality)
¼ cup heavy or whipping cream
1 cup (2 sticks) cold butter, cut into pieces
1 cup confectioners' sugar

Cake:
Preheat oven to 350 degrees F.

Grease two 9-inch round baking pans; line bottoms with waxed paper (optional).

Pour milk over chocolate and microwave until smooth at 30 second intervals.

In small bowl, combine flour, baking soda, salt, and baking powder; set aside.

In large mixer bowl, beat sugar and butter until light and fluffy. Gradually blend in melted chocolate mixture and vanilla extract. Add eggs, 1 at a time, beating well after each addition. Add flour mixture alternately with sour cream.

Pour into prepared pans. Bake 30-35 minutes or until wooden toothpick inserted into center comes out clean (watch to make sure you do not overbake). Cool 15 minutes; remove from pans. Cool completely.

Raspberry Filling:
In small mixer bowl, combine heavy cream, raspberries and sugar; beat until stiff peaks form. Refrigerate until ready to use.

White Buttercream:
Pour heavy cream over chocolate and microwave until smooth at 30 second intervals. Transfer to large mixer bowl; cool to room temperature.

Gradually beat in cold butter and confectioners' sugar; continue beating until light and fluffy.

Assembly:
Split cake layers horizontally in half. Place 1 layer on cake plate; spread with 1/3 of Raspberry Filling. Repeat with remaining layers and Filling. Frost cake with White Buttercream. Garnish with raspberries and mint, if desired. Store in refrigerator.

Spreading the first layer with filling:


Ready to be iced!


Yum!

Thursday, February 12, 2009

Garlic Knots (and Pizza Dough)

So I'm thinking I would probably win the award for "Ugliest Garlic Knots", if there was one. While I was folding the dough into the knots, I couldn't do the first knot tight enough and was left with a loose shape that doesn't really look like anything. But after I baked them, they came out a little better. Just look at them before the second rise though:

Laughable, right? I must say though, I have never made pizza dough before (always spent the money on store-bought) but after making this pizza dough, I will never go back! It was so easy to make and easy to work with that it would be silly not to try it again! You can certainly cut down on the fat content in these little guys by using less butter; but I don't recommend it. Enjoy the delicious butter and garlic combo and just go for an extra-long run tomorrow ;)

Garlic Knots
Makes 8 knots
1 recipe basic pizza dough (recipe below)
1/2 cup butter
5 garlic cloves, minced or crushed
salt

After you let the pizza dough recipe complete it's rise, roll out on a floured surface into large rectangle, 1/2 inch thick.

Using pizza cutter or sharp knife, cut into measured out eight 1-inch wide strips. Take each strip and tie into a basic knot. Take end that is underneath and fold it over and into the middle. Take end that is over top and fold it under.

Place knot onto parchment lined baking sheet. Repeat with all knots. Sprinkle generously with salt, cover with wax paper and kitchen towel and let rise until doubled in size, about 1 hour.

Preheat oven to 375 degrees F.

In small saucepan over medium low heat, combine butter and garlic. Stir until butter mixture is completely melted. Using pastry brush, generously brush the tops of the dough with the butter mixture.

Place in oven to bake until turning golden brown, about 12-15 minutes. Remove from oven, brush with remaining butter mixture and serve.

Basic Pizza Dough
Makes 1 crust

1 tablespoon active dry yeast
3/4 c. plus 2 tablespoons lukewarm water (105-115 degrees F)
2 3/4 cups all-purpose flour
1 teaspoon salt
1 tablespoon olive oil

Combine yeast and water in small bowl and let stand until slightly foamy (about 10 minutes).

Combine flour and salt in large bowl and form into a mound. Make a well in the center and add the yeast mixture.

Using a fork and stirring in a circular motion, gradually pull the flour into the yeast mixture. Continue stirring until a dough forms.

Lightly flour a work surface with some additional flour and transfer the dough to it. Using the heel of your hand, knead the dough until it is smooth and elastic, about 10 minutes. Form the dough into a ball.

Brush a large bowl with the olive oil and place the dough in it. Cover with plastic wrap and let rise at room temperature until doubled in size, 1 to 2 hours.

Turn the dough out onto a surface dusted with the remaining flour. Punch down the dough and, using your hand, begin to press it out gently into the desired shape.

Spinach Salad with Bacon, Mushrooms, and Warm Shallot Vinaigrette

I really don't like to give recipes for salads because, really, all they consist of are a bunch of ingredients that you like thrown in a bowl together. But this dressing is REALLY good. It has the creamy texture from the mustard and the tang from the vinegar. I am not sure where I originally got it from, but I know that I have tweaked it according to our tastes. When I want to cheat with the bacon, I just buy a box of that already-cooked bacon; but of course the real stuff is better! Amounts of ingredients are flexible - add as much or as little of something as you like!


Spinach Salad with Bacon, Mushrooms, and Warm Shallot Vinaigrette
from Colleen's Kitchen
Makes about 8 servings

1 bag baby spinach, washed and dried
8 ounces sliced mushrooms
about 10 ounces bacon, cooked and chopped
1 medium shallot, minced
1 tablespoon olive oil
3 tablespoons Dijon mustard
3 tablespoons Balsamic vinegar
2/3 cups good quality extra virgin olive oil
kosher salt and coarse ground black pepper

Combine spinach, bacon, and mushrooms in large salad bowl.

Heat 1 tablespoon olive oil in small skillet over medium heat. Add shallot and cooked until slightly tender, 3-5 minutes.

Combine mustard, vinegar, and shallots in small bowl. Slowly whisk in 2/3 cup olive oil. Season to taste with salt and pepper.

Heat dressing in microwave 20-30 seconds. Either toss dressing with spinach mixture or serve dressing alongside.

Wednesday, February 11, 2009

Eggplant, Tomato, and Zucchini Stacks

This dish is very impressive to serve to company because each person gets their own little individual stack of vegetables. Each vegetable really pops out at you, so you have to like all three in order to enjoy this! But the layers of vegetables in addition to the herbs and cheeses make a very nice accompaniment to any meal.

I changed a few things from the original recipe, namely the amount of onions. The original recipe calls for 4 onions, with only 8 servings, so that means each person is eating half of an onion! I knew that wouldn't fly with my family, so I brought it all the way down to one and it still had a nice onion flavor. Additionally, I felt that the "stack" as a whole was a little dry, so I am adding some more cheese to this version of the recipe (can't hurt, right?!).

Onions and herbs


Eggplant, Tomato, and Zucchini Stacks
adapted from Williams-Sonoma
Makes 8 servings

3 tablespoons olive oil, plus more for drizzling
1 yellow onion, diced
Salt and freshly ground pepper, to taste
2 garlic cloves, minced
10 fresh basil leaves, cut into thin strips
1 tablespoon chopped fresh oregano or 1 teaspoon dried
2 tablespoons chopped fresh flat-leaf parsley or 2 teaspoons dried
1 medium eggplant, sliced into 16 slices
4 medium tomatoes, sliced into 16 slices
4 small zucchini, sliced into 48 slices
1 cup shredded mozzarella cheese
1/2 cup grated Parmesan cheese

Preheat an oven to 425°F.

In a large sauté pan over medium-high heat, warm 2 tablespoons of the olive oil. Add the onions, salt and pepper and cook, stirring occasionally, until soft, about 10 minutes. Add the garlic, basil, oregano and parsley and cook for 2 minutes more. Remove the pan from the heat.

Drizzle one tablespoon olive oil over the bottom of a 13 x 9 baking dish. Place 8 eggplant slices in a single layer in the pan and season with salt. Top each with 1/2 tsp. onions and 1 tomato slice and season with salt. Top each with 3 slices of zucchini, then 1 tablespoons shredded mozzarella cheese.

Repeat layers: eggplant, salt, onions, tomatoes, salt, zucchini, mozzarella cheese.

Drizzle each vegetable stack with olive oil. Bake until the vegetables are tender, about 40 minutes.

Sprinkle each stack with 1 tablespoon Parmesan cheese and bake for 7 to 10 minutes more. Let the vegetables rest for 5 minutes before serving.

Eggplant ready to be stacked:

First layer complete (without mozzarella):

And ready to eat!