Wednesday, April 29, 2009

Sauteed Zucchini and Tomatoes

My mom has been making this wonderful side dish for as long as I can remember. It's simple to make, doesn't need the oven in case you have other things baking in there, and is a way of getting your vegetables along with some cheese! I had an extra regular tomato that I used in these pictures, but I recommend using cherry or grape tomatoes, they keep their shape much better while cooking.

The ingredient amounts below are enough for Chuck and I to have a large serving each, so just double, triple, or more for a larger crowd. I wouldn't recommend making this in advance, because it will most likely get soggy while waiting in the refrigerator.

Sauteed Zucchini and Tomatoes
from Jo's Kitchen
Makes 2 servings
2 teaspoons extra virgin olive oil
1 large clove garlic, minced
1 medium zucchini, cut into approx. 1/4"-1/2" slices
a handful of cherry or grape tomatoes, cut in halves
1/2 cup (approx.) shredded mozzarella cheese
kosher salt and coarse ground pepper

Heat olive oil in a medium skillet over medium heat. Add zucchini, season with salt and pepper. Let cook until golden brown on one side, about 3-5 minutes then flip and cook on the other side, 3-5 minutes more.

Add the tomatoes and heat through. Sprinkle with shredded cheese and heat until cheese melts. Season again with salt and pepper if desired. Serve immediately.

Tuesday, April 28, 2009

Lemon Rosemary Chicken Thighs

I have posted here before about how fabulous and delicious chicken thighs are. Seriously, you can't really go wrong with them, and are really missing out if you think the only way to eat chicken is dry chicken breast! So when I saw this recipe involving lemon and rosemary, I thought it was perfect for springtime. Chuck and I both loved this and I served it with garlic and rosemary roasted potatoes and sauteed zucchini and tomatoes (post later this week).

It definitely did not disappoint! The garlic and rosemary mixture that you pour over top of the chicken is delicious and is really nice to baste the chicken with as well after it comes out of the oven. I actually prepped this several hours in advance and let it sit in the refrigerator like this:

and I really think it added even more flavor to the finished product.

I adjusted the amounts from the original recipe since I bought a package of four thighs. And make sure you buy skin-on meat - even if you don't eat the skin, it makes a much juicier and flavorful piece of chicken!

Lemon Rosemary Chicken Thighs
amounts adjusted from Stacey Snacks
Makes 2-4 servings

4 chicken thighs, skin-on (about 1 1/2 pounds)
1 lemons, cut into 4 slices
4 sprigs of fresh rosemary
2 tablespoons olive oil
a little less than 1 tablespoon chopped fresh rosemary
1 large clove garlic, minced
a little less than 1 tablespoon kosher salt

Preheat oven to 425 degrees F.

Place the lemon slices in an 8 x 8 baking dish. Lay a sprig of rosemary on top of each lemon slice. Place a thigh on top of each lemon/rosemary stack, skin up.

Whisk together the olive oil, chopped rosemary, minced garlic, and kosher salt. Pour over the chicken and rub into skin.

Bake for 55 minutes or until chicken is cooked through (internal temperature should read 180 degrees). Baste with lemon-garlic sauce from the bottom of the dish.

Sunday, April 26, 2009

Lemon Sugar Crusted Blueberry Muffins

Blueberry muffins are one of my favorite kinds of sweet breakfast (or anytime foods) so when I saw this recipe over at My Kitchen Cafe, I knew I wanted to try it! Melanie said the muffins were phenomenal so I took her word and went for it!

Due to the outrageous blueberry prices around here lately, I used frozen berries and they turned out delicious. Just make sure NOT to thaw the berries before you use them. These muffins take a little bit of time because there are several components, but trust me, they're worth it. They got rave reviews all around and I look forward to making them again!

I didn't have to change anything except the baking time from the original recipe (mine needed to bake about 22 minutes), so I am just going to link you right to the source:

Enjoy!

Swirling the blueberry reduction into the muffins:

Sprinkling the lemon sugar crust:

Mmmmmm

Wednesday, April 22, 2009

Baked Meatballs

My friend Holly recommended this recipe to me, saying they were super easy since you just have to bake the meatballs instead of cooking them in a skillet. I normally bake my meatballs anyway, especially when making them to freeze with sauce, but I have never thought to make them in a mini-muffin tin! I was a little worried about all the fat that would be sitting at the bottom of each cup by the end of baking but I used ground turkey instead of the original recipe's suggestion for veal/pork/beef mix, so there was very little fat leftover.

The addition of spinach to these little guys makes for a healthier meatball, and also adds a very nice taste. We really enjoyed these, and the recipe made enough for me to freeze some for another meal! I served them over ravioli and topped with homemade marinara sauce.

Baked Meatballs
slightly adapted from Alton Brown
makes 24 meatballs

1 and 1/3 pound package (approximate) ground turkey
5 ounces frozen spinach, thawed and drained thoroughly
1/2 cup finely grated Parmesan
1 whole egg, slightly beaten
1 1/2 teaspoons dried basil
1 1/2 teaspoons dried parsley
1 teaspoon garlic powder
1 teaspoon kosher salt
1/2 teaspoon red pepper flakes
3/4 cup bread crumbs, divided
Preheat the oven to 400 degrees F.

In a large mixing bowl, combine the ground turkey, spinach, cheese, egg, basil, parsley, garlic powder, salt, red pepper flakes, and 1/4 cup of the bread crumbs. Using your hands, mix all ingredients until well incorporated. Use immediately or place in refrigerator for up to 24 hours.

Place the remaining 1/2 cup of bread crumbs into a small bowl. In the mixing bowl, roughly divide the meat mixture into four equal parts. Using your hands, break each quarter into 6 equal parts. Shape each mound into a ball, roll in the bread crumbs and place the meatball in individual, miniature muffin tin cups. Bake for 20 minutes or until golden and cooked through.
Into the oven...

...and out of the oven!

Tuesday, April 21, 2009

Eating for two (and cooking for almost no one!)

So you may have noticed that I have really been slacking lately on the blog posts. I used to pride myself on posting if not everyday, then at LEAST every other day. If you are a regular reader, you know by now that has NOT been happening.

But trust me, there is a good reason! There will be a new addition to the Cooking This and That household on or around October 31st! Halloween also happens to be Chuck's birthday so he is very excited that he may share a birthday on "the greatest day of the year" with his son or daughter.

Cookies by the very sweet Katie - soooo delicious!

Not that this excuses my lack of blog updates but perhaps it gives a better reason than the fact that I have been lazy in the kitchen! Chuck has picked up a lot of slack with cooking dinner and making sure we are all fed (thanks, bud!). Fortunately, I spent a lot of time in the kitchen this past weekend so I am hoping that the fatigue/loss of appetite/slight nausea is almost gone and I can get back to cooking as much as I normally do!

Sunday, April 19, 2009

Oreo Fudge Bars

I have had this recipe saved for awhile now and once I finally made these, I was kicking myself for not making them sooner! There are basically three steps involved in putting this together: crust, filling, and topping. Then bake and you have a delicious, fudgey bar filled with that fabulous Oreo taste.

These are definitely better chilled because then you get more of that "fudge" taste; so just keep them in the fridge until you are ready to serve!

Oreo Fudge Bars
Makes 24-36 bars

1 (16 ounce) package of Oreo cookies
1/4 teaspoon salt
1 stick butter, melted
1 (14 ounce) can sweetened condensed milk
1 teaspoon vanilla extract
1 1/4 cups semi-sweet chocolate chips
1/2 cup mini chocolate chips

Preheat the oven to 325 degrees F. Coat a 13 x 9 baking dish with cooking spray (preferably the kind with flour).

Coarsely chop 6 Oreo cookies and set aside.

Put the rest of the cookies into a food processor, add the salt, and process until you have fine crumbs. You can also do this by placing the cookies in a sturdy plastic bag and crushing with a rolling pin.

Melt the butter and gently stir into the Oreo mixture. Press firmly into the bottom of the prepared pan.

Combine the semi-sweet chocolate chips, sweetened condensed milk, and vanilla in a microwaveable bowl. Microwave, uncovered, for one minute. Stir together until the chips melt. Microwave at 15 second intervals if chips are still not melted.

Spread evenly over the prepared cookie crust. Sprinkle the mini chocolate chips and the Oreo cookies chunks over the top of the filling. Press down gently into the chocolate topping.

Bake for 20-22 minutes, until set. Allow to cool on the counter for 1 hour. Chill in fridge until completely cold and then cut into bars.

Tuesday, April 14, 2009

Tomato Bacon Cups

My mom took me to a cooking class at one of her friend's houses a few months back; where we sat in this woman's gorgeous kitchen and she cooked a delicious meal for us. This recipe was the appetizer of the night, and it's so simple you won't believe it. There is minimal chopping, minimal prep, and it results in a tasty little bite full of tomato, bacon, and cheese flavor.

The original recipe calls for a 12-ounce tube of refrigerated biscuits. I could only find the Grands biscuits at the store, which are 16 ounces and come 8 to a can. So I divided each biscuit up into 5 sections and that in turn gave me 40 bites (instead of the 30 the recipe said it yielded), with more than enough filling to cover them. Trust me, you will want more of these so buy the Grands!

I actually made these a whole day in advance, baked them, and then just reheated before serving and they still came out delicious. You can certainly do that, or just serve right from the oven!

Tomato Bacon Cups
slightly adapted from Paula's Pantry
Makes 40 bites
1 medium tomato, seeded and finely chopped
1/2 cup plus 2 tablespoons real bacon bits
1/2 cup plus 2 tablespoons shredded swiss cheese
1/2 cup plus 2 tablespoons mayonnaise (I like low-fat)
1/2 small onion, finely chopped
1 1/4 teaspoons dried basil
1 tube (16.3-ounces) Grands refrigerated buttermilk biscuits

Preheat oven to 450 degrees F.

Combine the tomato, bacon bits, swiss cheese, mayo, onion and basil in a small bowl. Mix thoroughly and set aside.

Cut each biscuit into 5 equal wedges. Work with your fingers to make it as round as possible and press each round into a greased mini-muffin pan. Spoon tomato mixture into cups.

Bake for 10-14 minutes or until golden brown and cheese is slightly bubbly. Serve warm.

Saturday, April 11, 2009

Blackberry Crumb Cake

In searching for muffins or a coffee cake to take to my in-law's for Easter breakfast, I came across Dorie Greenspan's blueberry coffee cake and thought it looked perfect. A whole pint of blueberries in a moist cake topped with buttery crumbs - how could it not be delicious! Then I got the grocery store and discovered that blueberries were selling for $3.99 per 8 ounces. I turned quickly the the blackberries beside them and decided they would be great as well, for a little cheaper price!

Lots of people make a blueberry coffee cake, so I am happy that I wound up buying the blackberries instead. They add a beautiful, purple-y color to the cake. I apologize for the pictures but I have yet to actually bring this Easter breakfast so I needed to sneak out a piece to photograph and then put it right back. I cannot wait to have a whole piece of this tomorrow morning!

Don't be afraid of all the steps that appear below. This cake actually comes together fairly quickly. I omitted the nuts in the nuts in the crumb topping as well. Happy Easter if you celebrate!

Blackberry Crumb Cake
Makes an 8x8 pan

For the crumbs:
5 tablespoons unsalted butter, room temperature
1/4 cup sugar
1/3 cup packed light brown sugar
1/3 cup all-purpose flour
1/4 teaspoon salt
1/2 chopped walnuts (optional)

For the cake:
1 pint blackberries (preferably fresh)
2 cups plus 2 teaspoons all-purpose flour
2 teaspoons baking powder
1/2 teaspoon baking soda
1/4 teaspoon salt
1/4 teaspoon ground cinnamon
1/8 teaspoon freshly grated nutmeg (ground is fine)
2/3 cup sugar
grated zest of 1/2 lemon or 1/4 orange
6 tablespoons unsalted butter, room temperature
2 large eggs, room temperature
1 teaspoon pure vanilla extract
1/2 cup buttermilk

Preheat the oven to 350 degrees F. Coat an 8 x 8 baking dish with cooking spray or butter. Place on a baking sheet.

To make the crumbs:
Place all the ingredients except for the nuts in a food processor. Pulse just until mixture forms large crumbs. Place topping in bowl, cover and refrigerate until needed.

To make the cake:
Gently toss the blackberries with 2 teaspoons of flour in a small bowl with your fingers. When berries are just coated, set aside.

Whisk together the remaining flour, baking powder, baking soda, salt, cinnamon, and nutmeg in a medium bowl; set aside.
Rub the sugar and the zest together with your fingers in the large bowl of a stand mixer; just until fragrant. Add the butter and beat at medium speed until light, about 3 minutes.

Add the eggs, one by one, beating for 1 minute after each egg. Beat in the vanilla extract. With mixture on low, alternately add the flour mixture and buttermilk in the following order: 1/3 flour, 1/2 buttermilk, 1/3 flour, 1/2 buttermilk, 1/3 flour. Mix until you have a thick, creamy batter. Gently mix in the berries with a rubber spatula.

Pour the batter in to the prepared pan. Remove the crumb mixture from the refrigerator and crumble over the top of the batter with your fingers. Press the crumbs down slightly into the batter.

Bake 55 to 65 minutes, or until crumbs are golden brown and a cake tester inserted in the middle of the cake comes out clean. Transfer the cake to a rack and serve warm or at room temperature.

Wednesday, April 8, 2009

Lasagna Casserole

This is a great weeknight meal and can easily be prepared in advance. It is fairly healthy if you use all low-fat cheese and lean ground turkey. I was excited to see that this had ricotta cheese in it, because I love it, and doubly excited to see that it was mixed with cream cheese and sour cream. Chuck doesn't like the texture of ricotta so I rarely cook with it, but mixed with the other ingredients, you can barely tell it's there (but still get all the yummy taste from it)!

I made a few small adaptations from the recipe, just based on different amounts of things I had on hand; but all in all it worked exactly how it was supposed to! The ground turkey blends nicely with the tomato sauce and the creamy cheeses make this a very satisfying meal.

Lasagna Casserole
slightly adapted from Lauren's Kitchen (originally from ...and a cookie for dessert)
Makes 6-8 servings

5 cups uncooked egg noodles
1 1/4 pound package ground turkey
2 garlic cloves, minced
half of one medium onion, finely chopped
24 ounces tomato sauce (not marinara, just plain tomato sauce)
1/2 teaspoon sugar
1/2 teaspoon salt
1/8 teaspoon pepper
dried oregano, basil, and parsley, to taste
1 package (8 ounces) reduced-fat cream cheese, room temperature
1 cup reduced-fat ricotta cheese
1/4 cup reduced-fat sour cream
1 cup shredded mozzarella cheese

Preheat oven to 350 degrees F. Coat a 13 x 9 pan with cooking spray. (Or use two 8 x 8 pans if you want to save one. See more specific directions here.)

Cook noodles according to package directions. Drain, do not rinse.

Meanwhile, in a large nonstick skillet over medium-high heat, cook turkey, garlic, and onion until meat is no longer pink; drain.

Stir in the tomato sauce, sugar, salt, pepper and dried herbs; heat through on low heat. Stir noodles into mixture.

In a small bowl, beat the cream cheese, ricotta cheese and sour cream until blended. Spoon half of the noodle mixture into prepared dish. Top with cheese mixture and remaining noodle mixture.

Cover and bake for 30 minutes. Uncover; sprinkle with mozzarella cheese. Bake 5-10 minutes longer or until heated through and cheese is melted.

Monday, April 6, 2009

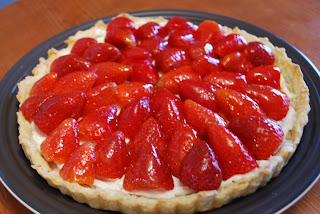
Strawberry Tart with Orange Cream

A fruit tart is a wonderful dessert to make for any occasion. It always looks impressive, and is usually fairly simple to make. There is something about that arrangement of the fruit on top that makes it look like a bakery-bought dessert. I am fan of tarts with a sweet cream cheese layer, so this recipe really caught my eye.

I was looking for a colorful, springy dessert to bring for Palm Sunday dinner with our families. Katie pointed out this recipe to me and I printed it out right away! The light orange flavor paired with the apricot-glazed strawberries, all on a sweet tart dough is delicious.

If you don't have the time or the desire to make your own tart dough, a frozen pie crust will do the trick. Just defrost it and use exactly as the directions indicate. I don't have pie weights so I always use my little ramekins when baking the dough:

I didn't have to change anything from the original recipe so I will just link you to the original on the Williams-Sonoma website here:

Saturday, April 4, 2009

Egg Salad

Everyone has their own version of egg salad, and I wanted to share mine with you. It's very simple, and despite Chuck's comments to the contrary, is delicious! I think you either love or hate egg salad, and right now my husband and I are firmly in different camps. :)

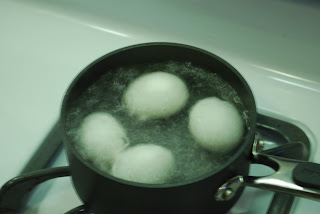
I have included at the bottom of the recipe how to hard-boil eggs. Again, this is something that everyone has a different way of doing, but this version hasn't failed me yet! You will want to chill the eggs before you add them to the egg salad. I personally like this on a sandwich, but it would also be delicious over a bed of lettuce.

Egg Salad
from Colleen's Kitchen
makes enough for 2 hearty sandwiches

4 eggs, hard-boiled*
2 tablespoons low fat mayo
2 tablespoons sweet relish
2 teaspoons Dijon mustard
kosher salt and coarse ground black pepper, to taste

Chop eggs, either with egg slicer or by hand. Place in medium-sized bowl. Add remaining ingredients and mash together with fork.

Serve on hearty slices of bread or on top of a green salad.

*Colleen's way to hard-boil eggs

Place eggs in small saucepan, cover with water. Cover pan and bring to a boil. Uncover and continue at a steady boil for exactly 10 minutes. Drain eggs, cover with cold water, drain again, cover with cold water and add ice cubes. Let cool and then transfer to refrigerator.